Creating groups in LabStats is the key to getting actionable usage data.
Each computer in LabStats should be organized into a group. Groups are usually set up to reflect physical spaces, like computer labs and classrooms, and allow you to run reports based on location.
Group Hierarchy Overview
You can nest groups by building names (and campus names if you have multiple campuses), which helps you stay organized and compare usage data across larger categories.
You can set up hierarchy manually and organize it in a way similar to the example below.
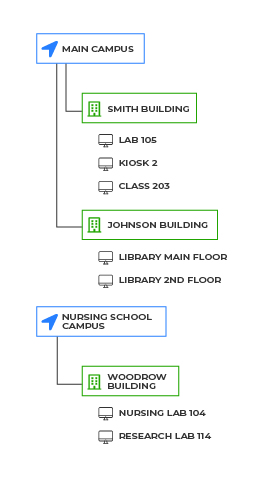
Be sure to name your groups in a way that students and faculty will recognize, as those group names will be public if you utilize LabMaps or the Remote Access Dashboard.
Related Video: LabStats 101: How to Create Groups
Creating a Group
- Navigate to Computers, then click Groups.
- Click Create Group.
- Enter information to create the new group.
- Name—The name of the group.
- Description—A brief description of the group.
- Create In—Shows the parent group or root if no parent.
- Contents—Choose whether the group will contain groups or computers.
- Advanced—Change the way computers in the group are tracked.
- Click Save.
Subgroups
If a newly created group should contain other groups, a new page will load displaying the Group Details, allowing the creation of subgroups.
Computers
If a newly created group should contain computers, a new page will load allowing the creation of computers.
Group Details
The Group Details page displays the following information about the group:
- ID—The group ID.
- Name—The name of the group.
- Description—The group description.
- Belongs To—The parent group.
- Tracking Type—This shows whether the group is tracked in Default mode or Inactivity mode.
- Computer Count—This is the number of computers in the group.
- Assigned Schedule—This is the schedule that is applied to the group.
- Tags—These are the tags applied to the group.
- Edit Group—Edit the name, description or delete the group.
- Edit Lab Features– This allows you to specify physical features of this group. Note these features are for informational purposes only, you cannot filter or run reports against these.
- Move Group—Move the group to a new group or to the root folder.
- Manage Hostname Definitions—View, edit or delete current hostname definitions.
- View Computers in this Group—Return to the group’s computer list.
Charts
Clicking the Charts tab from within a group will display a pie chart for the Current Utilization of the group, showing the group’s utilization over the past 24 hours, and the most used computers and applications over the past 24 hours with their utilization percentages.
Groups with Remote Computers
For remote labs, simply add “Remote” to the name of the group.
For dual-purpose labs, create two new groups—one for remote computers and one for in-person computers. These new groups should be created under a parent group that holds all the machines in one location (whether remote or not) so you have the ability to compare overall usage over time.

Have questions? Contact support@labstats.com.